Why did my gene change?

As a member of the Ensembl Outreach team, who is actively involved with training and user support, I often have to answer the question, “Why did the annotation of my favourite gene change?”

There are a few driving forces behind the changes in the annotation of any given gene.  Two of those are the growing number of sequences that are deposited in sequence databases nightly, and the updates to the genomic assembly of a given species.  Regardless of the reason, changes and improvements will result in a revised and refined annotation of our Ensembl geneset.

However, clinical researchers in particular may prefer to work in a more controlled, less changeable environment. You may wonder then: “Is there annotation in Ensembl that won’t change?”  Yes, there is!

Are there genes that don’t change?

There is a set of gene sequences where changes are strictly prohibited.
These are the LRG records. An LRG or Locus Reference Genomic has a fixed and stable reference sequence for reporting and diagnosing variants that cause diseases in humans.

More than 700 records have been annotated so far. They have been mapped everywhere in the human genome, with the exception of the Y chromosome and the mtDNA.

Slide1

LRG loci currently annotated in human.

The majority of these 700 records (59%) are publicly available on the LRG website, whereas the remaining are still in the validation phase, carried out manually by LRG curators. The ultimate goal is to provide an LRG record for every single protein-coding gene in the human genome. It’s certainly a mammoth task! So, genes with clinical implications will be prioritised.

Slide1

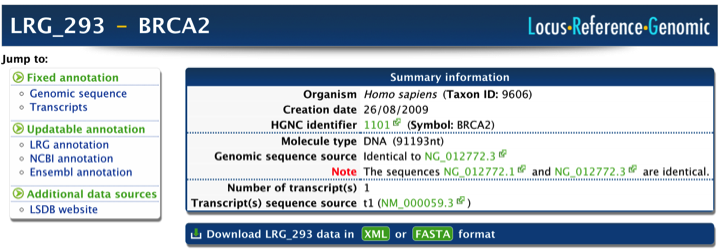
Summary information of LRG_293 (BRCA2 gene)

Stable sequences allow clinical geneticists and the research community to report their variation data in a more controlled and stable framework. They will be able to perform consistent comparisons of variants reported in LRG coordinates against other databases and therefore be better equipped when diagnosing diseases.

Viewing LRGs in Ensembl

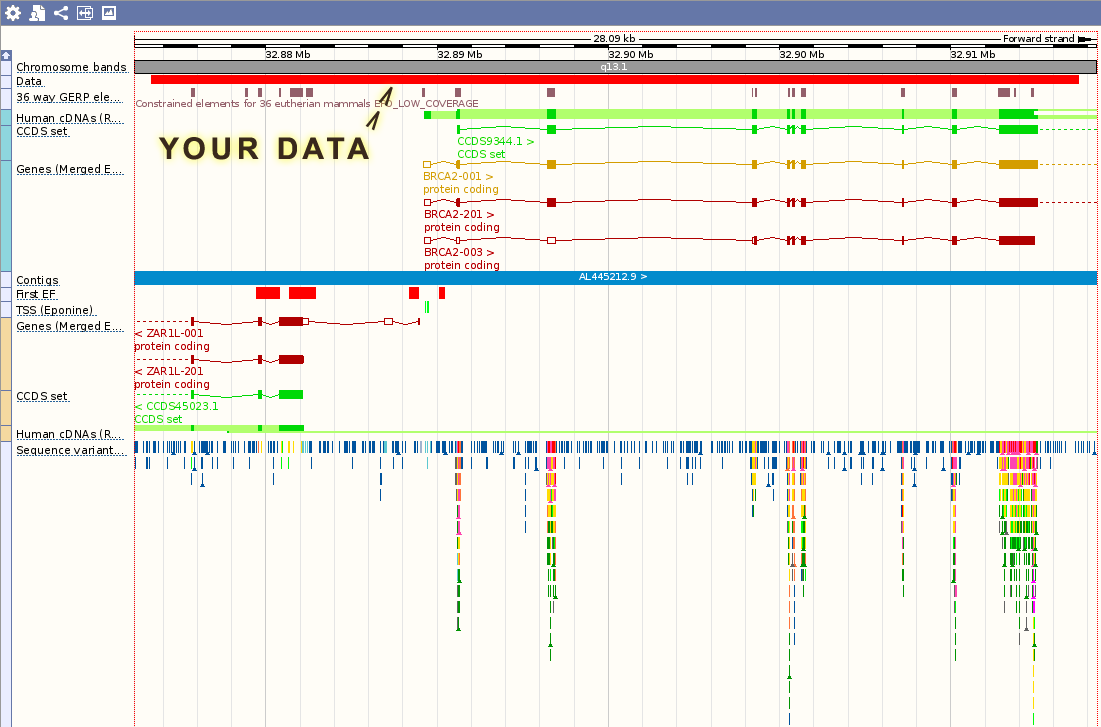
In addition to the LRG website, clinical geneticists and others can investigate any of the public LRG records in Ensembl too, where they can be viewed in the context of our comprehensive annotation of genes, variants and regulatory features, among many other features.

Use Ensembl to search for an LRG and get all the variants that map to it. You can then check the functional impact of these variants. For more tips on how to investigate LRG records in Ensembl, contact us.

Slide1

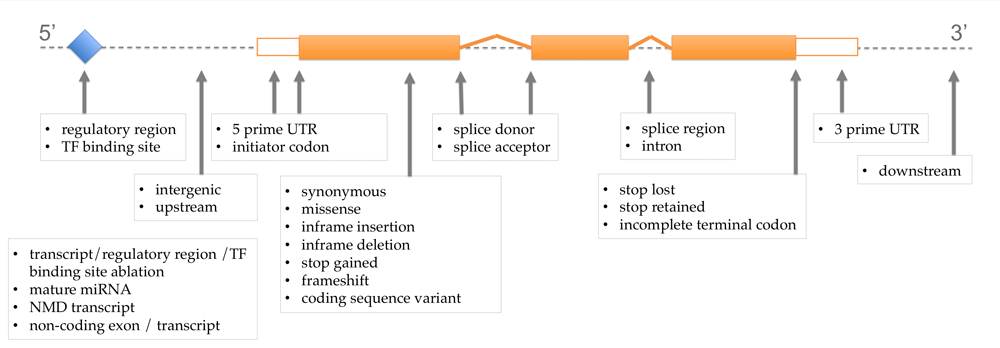
Variation consequences calculated with VEP.

Can I request my own LRG?

You can request an LRG record for a clinically relevant gene. For more details on how to submit the request, have a look at the LRG request page.

We are pleased to announce a new bioinformatics application, WiggleTools, described in a recent Application Note in Bioinformatics. It allows you to quickly and conveniently compute statistics across many (up to the hundreds) of genome-wide datasets.

WiggleTools is first a data summary tool. It collapses into a single summary a large collection of genome wide datasets, such as BigWig, BigBed or BAM files. You can then view on the Ensembl browser a single statistic that combines all the datasets for a given project rather than displaying a pileup of several data tracks.

For example, if you wanted to display the average binding probability for each TF in the ENCODE dataset you could display a huge number of tracks on the browser, one for each TF. It is clearly difficult to interpret the view as one has to scroll up and down endlessly

EnsEMBL_Web_Component_Location_ViewBottom-Homo_sapiens-Location-View-74- (1)

And here is a summary track which recaps all of the data above in a single track (explained below):

EnsEMBL_Web_Component_Location_ViewBottom-Homo_sapiens-Location-View-74- (2)

Overall binding probability for all TF in a single track. Note that you now have room to add other datasets in the ‘Region in detail’ view.

To better handle different types of signal, WiggleTools offers a range of statistics on a set of values, such as mean, median, minimum, maximum, or variance.

Besides boiling down large collections of data into a single track, WiggleTools also allows you to compare groups of datasets. For example, if you have a collection of case and control replicates, you can compare the means of the cases and controls, but you can also apply more advanced statistics as Welch’s T-test (for normally distributed variables) or Wilcoxon’s rank sum test (for other variables).

WiggleTools has been designed with efficiency in mind. Streaming the data keeps memory requirements to a minimum by only storing local information. Functional components communicate directly in memory, without disk access or string passing. Parallel threads keep the system going smoothly regardless of irregularities in disk access. Finally, a novel BigWig file merging tool, bigWigCat, which we contributed to Jim Kent’s C library, allows WiggleTools to make the most of a cluster of computers. For example, to compute the sum of 126 BigWig files (a total of 121 GB) takes less than 17 minutes in total, on 116 CPUs, and fits on less than 5.5 GB of RAM.

A statistics package for genomic datasets

With WiggleTools, you can pretty much play with the BigWig, BigBed and Bam files lying on your filesystem as if they were vectors loaded in R, Numpy or Matlab. A simple language, which resembles LISP, is enough to define the functions that WiggleTools then runs in a single pass through the data.

A use case: we wanted a summary of transcription factor (TF) binding across the genome. For every position in the genome, we had estimated for each TF the probability of observing binding in a random cell type. To compose these datasets, we wanted to compute an overall probability of observing any binding at that position. We therefore wanted to compute:

Untitled

WiggleTools can create the appropriate function on the fly and compute the result in a single pass through the files. Total run time: 34s, max memory: 20MB.

For more information on WiggleTools, have a look at our paper in Bioinformatics, and our code on Github.

Over the past few months a number of users have asked us how to install Ensembl and its dependencies on OSX. Over the past 4 years I have had to do this quite a number of times and thought it best to share my personal best practice. There are alternatives to this methodology involving supplementing the stock OSX Perl with extra libraries or using ActiveState for OSX. I recommend neither method. Apple never developed a package management tool that works well with Perl libraries and so upgrades carry a level of risk. As for ActiveState they do not currently support DBD::mysql on OSX. Instead we will install a new version of Perl using Perlbrew; a Perl installation management tool.

This guide will require admin rights on your mac and assumes some understanding of the terminal. If you do not feel confident enough then try using our Virtual Machine instead.

Pre-Flight Checks

You must have Xcode and GCC installed on your mac. Check by running the following command and see if you get a response similar to the one pasted below

> gcc -v
Using built-in specs.
Target: i686-apple-darwin11
Configured with: /private/var/tmp/llvmgcc42/llvmgcc42-2336.11~182/src/configure --disable-checking --enable-werror --prefix=/Applications/Xcode.app/Contents/Developer/usr/llvm-gcc-4.2 --mandir=/share/man --enable-languages=c,objc,c++,obj-c++ --program-prefix=llvm- --program-transform-name=/^[cg][^.-]*$/s/$/-4.2/ --with-slibdir=/usr/lib --build=i686-apple-darwin11 --enable-llvm=/private/var/tmp/llvmgcc42/llvmgcc42-2336.11~182/dst-llvmCore/Developer/usr/local --program-prefix=i686-apple-darwin11- --host=x86_64-apple-darwin11 --target=i686-apple-darwin11 --with-gxx-include-dir=/usr/include/c++/4.2.1
Thread model: posix
gcc version 4.2.1 (Based on Apple Inc. build 5658) (LLVM build 2336.11.00)

Later versions of OSX (Mavericks 10.9) are intelligent enough to instal the GCC tools automatically once you have confirmed. If you are on an earlier version of OSX and do not get this prompt then following the instructions below (this will require admin privileges)

  1. Install Xcode from the Apple AppStore
  2. Run it Applications
  3. Install the command line utilities by clicking on Xcode in the menu
    • Preferences
    • Downloads
    • Click “Install” by the Command Line Tools section

Additional information (with screenshots) is available from this Stack Overflow answer.

Installing Perlbrew

Firstly you need to install Perlbrew. This will create a directory called perl5 in your home directory. It will also ask to add commands to your shell’s profile (either .bashrc, .cshrc or .bash_profile) to bring the perlbrew binary onto your path. To install use the following commands:

> curl -L http://install.perlbrew.pl | bash

# Add this to the end of your ~/.bash_profile
> echo 'source $HOME/perl5/perlbrew/etc/bashrc' >> ~/.bash_profile

Now install Perl 5.14.4 (you will have to wait a bit). The following command was run on a Mountain Lion installation (10.8.4). You must install a new version of Perl. Modifying the system version of Perl (including installing module updates) on OSX is a very bad idea and can cause unintentional side effects. To be safe always install your own version:

> perlbrew install -j 5 --as 5.14.4 \
--thread --64all -Duseshrplib perl-5.14.4

Fetching perl 5.14.4 as /Users/user/perl5/perlbrew/dists/perl-5.14.4.tar.bz2
Installing /Users/user/perl5/perlbrew/build/perl-5.14.4 into ~/perl5/perlbrew/perls/5.14.4

This could take a while. You can run the following command on another shell to track the status:

tail -f ~/perl5/perlbrew/build.perl-5.14.4.log

5.14.4 is successfully installed.

Later versions of OSX and Perl can sometimes fail during this compilation process citing issues with locale settings. Should you see this run the following command (stops any testing against the new Perl binary):

> perlbrew install --notest --as 5.14.4 --thread \
--64all -Duseshrplib perl-5.14.4

Now install cpanminus. This is our CPAN package manager and makes working with it a breeze.

> perlbrew install-cpanm

Now we will switch to using the new version of Perl by default and ensure that the switch worked.

> perlbrew switch 5.14.4
> perl -v | grep 'This is'
This is perl 5, version 14, subversion 4 (v5.14.4) built for darwin-thread-multi-2level

Installing MySQL Client Libraries

DBD::mysql requires access to libmysqlclient.18.dylib and the MySQL C headers to compile. MySQL’s Connector/C distribution ships with these files. However I have always found more success using a server installation and like having a personal MySQL server to develop against. This guide will only cover using a MySQL Server installation.

  1. Go to http://dev.mysql.com/downloads/mysql/
  2. Select a version compatible with your Mac
  3. I selected Mac OS X ver. 10.7 (x86,64bit), DMG archive MySQL Community Server 5.6.12. You may find a later version. Make sure to change all other commands accordingly
  4. Mount the DMG
  5. Install mysql-5.6.12-osx10.7-x86_64.pkg and double click the MySQL.prefPane
  6. Check you can start-up MySQL (required for DBD::mysql installation tests)
  7. Go to System Preferences > MySQL > Start MySQL Server
  8. Enter your system admin password

Installing core dependencies

Basic dependencies can be installed using the cpanm command. For core Ensembl that amounts to database bindings so lets bring in DBI.

> cpanm DBI

Should you wish to run any core test suites you will also need the following packages:

> cpanm Test::Differences Test::Exception Test::Perl::Critic

Installing DBD::mysql

Congratulations on getting this far. Now for the tricky bit. By default the required dynamic library is not available on OSX’s default search paths. You can solve by using one of the following 3 options. Once the library is available to OSX you can install DBD::mysql with the following command (ensure your MySQL server is running otherwise the library’s test suite will fail). I prefer to use the second option and symbolically link the library into /usr/lib but this does require admin rights.

> cpanm DBD::mysql

Option 1). Add MySQL’s lib directory onto the DYLD_LIBRARY_PATH

Works well for all command line terminals, does not require admin but will not work if you’re going to use a GUI based application to run Ensembl scripts.

> export DYLD_LIBRARY_PATH=/usr/local/mysql/lib/:$DYLD_LIBRARY_PATH

Option 2). Symbolically link the required library into /usr/lib

Works well for all applications but requires admin rights to create the symbolic link in /usr/lib

> sudo ln -s /usr/local/mysql/lib/libmysqlclient.18.dylib /usr/lib/libmysqlclient.18.dylib

Option 3). Add the library to install_name_tool

A more official OSX way of doing it but will require re-updating the library whenever you upgrade your MySQL installation. Also requires admin rights.

> sudo install_name_tool -id /usr/local/mysql-5.6.12-osx10.7-x86_64/lib/libmysqlclient.18.dylib /usr/local/mysql-5.6.12-osx10.7-x86_64/lib/libmysqlclient.18.dylib

Installing Ensembl

Nearly there. My best advice is to follow the installation instructions hosted on the Ensembl website. Once finished you should verify the installation is good. Ensembl ships with a program called ping_ensembl.pl. We will use this to check we can connect to Ensembl’s UK based MySQL servers and can find the species human.

> perl ~/src/ensembl/misc-scripts/ping_ensembl.pl
Installation is good. Connection to Ensembl works and you can query the human core database

The script will also try to diagnose any problems with missing dependencies. Remember should you need to install any additional dependencies use cpanm.

Congratulations

If you made it this far you should have a fully functional installation of Perl able to query Ensembl. More information on the API is available from our website along with tutorials covering the core, variation, comparative genomics and regulation APIs.

Should you have any issues then please do not hesitate to contact Helpdesk or follow our debug my Ensembl installation guide.

It has been quite a while since we’ve blogged about the VEP (Variant Effect Predictor), and in that time we’ve added a whole load of new features, particularly to the downloadable script version.

Structural variants

The VEP now supports finding the consequences of structural variants, with input either in VCF or tab-delimited format. Using the web interface to the VEP you can visualise which transcripts and features your structural variants overlap by clicking through to the Region in Detail view:

Screen Shot 2013-04-19 at 15.14.23 copy

The cache

We’ve really pushed the VEP script’s capabilities when using local “caches” (as opposed to using remote databases). Almost every feature of the VEP is now available when using the cache in offline mode. You can use a local FASTA file to quickly retrieve the sequences required to construct HGVS notations. You can even construct your own cache from a GTF file if your species isn’t supported by Ensembl.

Our cache for human now contains allele frequency data from phase 1 of the 1000 Genomes Project, and you can use these frequencies to filter your input (for example, you might want to filter out variants that are common in the combined European (EUR) population). We also now provide SIFT predictions for 8 species – human, mouse, zebrafish, pig, cow, chicken, rat and dog.

Plugins

We’re always trying to add new and useful features to the VEP, but we also recognise that other users have great ideas that they’d like to implement. The VEP script enables the use of plugins; these are bits of code that add extra functionality to the VEP. They can be used to retrieve data from remote sources, run external tools, filter output; pretty much anything you can think of can be accomplished in a plugin!

It’s easy to get started, and a basic plugin can be just a few lines of code – have a look at some of the examples we’ve created.

I recently added a plugin to retrieve data from dbNSFP – this is a great resource created by Liu et al in Houston, TX. They have, for every possible missense substitution in the human genome, pre-calculated pathogenicity scores, frequencies, conservation scores and a plethora of other things, and made all of this available as an easily downloadable file. To use this with the VEP, you just download the file and the plugin, run a couple of commands to get the data into the right format, and away you go – the VEP can now provide you with scores from LRT, MutationAssessor, MutationTaster, FATHMM and more for any missense substitution in your input.

Summary and HTML output

We had a number of requests for the VEP to provide summary statistics at the end of each run, and who are we to disappoint our loyal users?!? The VEP now writes a pretty HTML summary:
Screen Shot 2013-04-03 at 13.35.45 You can also view your output as HTML using the –html flag, which allows you to sort, filter and analyse your output on the fly.

Don’t hesitate to get in touch with us about the VEP – our developer mailing list is the best place for technical questions, with helpdesk for everything else.


From release 70 we store and display information on the type of consequence a variant has on overlapping regulatory regions (Ensembl regulatory features and Ensembl motif features) for human and mouse.

Web display
Consequence types for variations overlapping regulatory features in region in detail view
One of the major benefits of this is that we can highlight the predicted consequence types for a variant overlapping regulatory regions in the region in detail view. The Variation – Genes and regulation page gives more information on the type of consequence a single variant has on a specific regulatory region.

API
We store the data in two new tables: regulatory_feature_variation and motif_feature_variation. Both are populated in a similar way to the transcript_variation table. You can find further information on the table structures on our Variation database schema description page.

You can access the data using the Ensembl Variation Perl API. Please check the API documentation for examples of how to use the RegulatoryFeatureVariationAdaptor and the MotifFeatureVariationAdaptor. These new modules allow you to fetch MotifFeatureVariations or RegulatoryFeatureVariations on a VariationFeature, MotifFeature or RegulatoryFeature. This is in addition to the existing functionality for getting all RegulatoryVariationFeatures and MotifFeatureVariations using the VariationFeatureAdaptor.

If you have any questions please email helpdesk.

If you are interested in knowing the evolutionary history of your preferred Ensembl gene, you are in luck. Starting from this release (69) Ensembl has a new gene gain/loss tree view just for this purpose. This view shows the evolutionary history of a gene family by showing gains (expansions) or loss (contractions) on the number of members belonging to a given gene family.

The example below shows a detail of the evolutionary history of the human gene ZNF235 as displayed by this new Ensembl view. As you can see, it is a species tree with annotated branches showing significant expansions (in red), contractions (in green) or no significant changes (in blue). The nodes representing each extant species or ancestral node is labelled with the number of members of the family and the statistical significance of this change (or the lack of it).

Gene gain/loss tree view exampleView the example in Ensembl

If you want to know more about this view and how the data is generated check out its help page.

Please, try it out with your preferred genes and let us know your impressions (helpdesk contact form). We are working to include more useful information in the view and your input is important!

Did you ever wish you could resize our images/views to make them bigger? We now have a new icon on the blue image toolbar in beta.ensembl.org, and you can resize the image on one click.

Image resize icon

On clicking the icon, a menu to choose the size will appear with your current size greyed out (see figure below). There is also a best fit option which will resize the image according to your screen resolution.

Image resize menu

Have a look and let us know your thoughts by sending them to ensembl-beta@sanger.ac.uk or by clicking on the black feedback button at the right of the views in Ensembl Beta.

All feedback, improvement/suggestions are welcome, specifically:

Is it useful?

Is the menu clear enough?

Any other improvements?

Many thanks for your feedback!


Have you ever spent time changing your favourite Ensembl view (for example adding new tracks, changing the track order, or uploading custom data) and wished you could easily send the configured display to a colleague through one simple url? You can now do this on beta.ensembl.org.

Configurable images now have a link icon in their toolbars. If you click on this, it will give you a link to share with another user.

If you have any custom tracks turned on for the image, you will get the option to share these too (this is opt-in via checkboxes). This works with uploaded files, attached URLs, DAS and data hubs.

Custom tracks will only be shareable if they are displayed on the image (or in the case of data hubs, if any of the tracks in the hub are displayed).

If you send the url to a colleague, he/she will see the image configured in the same way that you have it.

You can also share configurations for a whole page by using the Share this page button in the left menu.

Please try it out. If you encounter any problems, please use the Feedback button on the beta site to tell us about them (or email ensembl-beta@sanger.ac.uk), making sure to include the link you are trying to share.

We are pleased to announce that we are now providing access to the ENCODE integrative analysis data from within Ensembl. These analyses bring together a multitude of experiments targeted at determining functional elements in the human genome sequence. This data is provided from an external source (a track hub at the EBI).  Although the Ensembl code supporting track hubs is still in preliminary form, we considered this ENCODE set sufficiently important to release the code early to enable us to provide access to this set.

Important: Please read the instructions below before activating this data!

As this dataset is very large (over 2800 tracks) it is not configured on by default in the Ensembl browser. To add the ENCODE hub tracks, click on the link below. Warning: users of IE6 or IE7 should not do this because performance in those browsers is inadequate and the page will not load.

Link to add ENCODE integrative analysis hub

No tracks from the hub are switched on by default. To turn on tracks from ENCODE, go to ‘Configure this page’ and click on one of the submenus under ‘ENCODE data’, for example ‘ENCODE genome segmentations’. It will take a few seconds to bring up the track list. Then switch tracks on or off by clicking on the box next to the track name and choosing a track style. For genome segmentations the ‘Compact’ track style looks good.  More information on configuring the display is available in our recently released video tutorial on region in detail view. Here’s an example of a region showing a few ENCODE tracks (HepG2 and K562 genome segmentations and cytosolic RNASeq tracks):

If you no longer need access to the ENCODE set of tracks, the hub can be turned off by going to the ‘Manage your data’ link in the left hand menu, and clicking on the trash bin icon for the ‘ENCODE data’ source to delete it from the ‘Configure this page’ menu.

We will be working over the next few months to extend our track hub support, including improving the performance and adding features of configuration interface.

From release 68, we are using Sequence Ontology (SO) terms for the variation consequences, in an effort to standardise terms across the different browsers, making it easier for users to do a cross comparison of variation annotation.  The UCSC Genome Browser will use these terms on their SNP details page around mid-August, dbSNP will update their web display in the next few weeks and the ICGC also intend to standardise on SO terms for describing somatic mutation consequences.

At the same time, we have added a couple more specific consequences for SNPs and in-dels (splice donor variant and splice acceptor variant for example)  and consequences for larger structural variants are now available through the Variant Effect Predictor (VEP). The complete list of terms and definitions are in our documentation.As you will see, the SO equivalents for our old terms are fairly straightforward. The most notable difference is that we have replaced “non-synonymous” with the more specific term “missense”, for changes in amino acid which do not include stop gained, as we already have a specific term for stop gained.

The old Ensembl terms are still available on the website (using”Configure this page”) and if you have text files or VEP output files with our old Ensembl terms, you can easily update these to using the SO terms by running the following script.